All posts in Auto Maintenance

What’s the Difference – Shocks, Struts and Springs?

Your vehicle’s suspension is a vital system – it ensures that you have a comfortable ride on virtually any driving surface, but it also helps provide better handling and even ensures longevity for your vehicle by eliminating jarring bumps and vibrations that would otherwise compromise its integrity. Your suspension system is actually built from a variety of different components, and understanding what these are and how they work is important, whether you’re repairing a blown shock or lowering your ride. The three most important components to know are your shocks, struts and springs.

Shocks and Struts

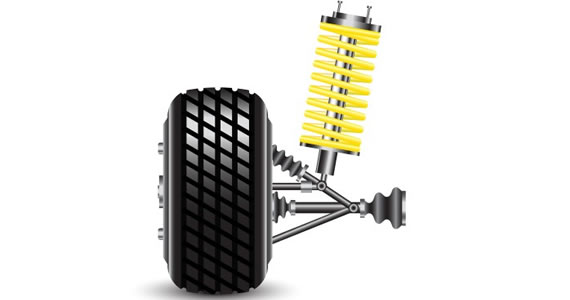
Shocks and struts are very similar to each other, and it can be tempting to think that they’re the same. They do the same job – a hydraulic piston is mounted within a framework that’s bolted to the vehicle above one of the four wheels. When your vehicle encounters a bump or dip, the piston extends or retracts in order to keep the vehicle level and reduce jarring/bouncing. However, while they do a similar job, they’re different components.

The main difference between the two is in the design of the component. Both shocks and struts can be found on the front or rear of the vehicle. Of the two, struts are more versatile, as they are actually structural components of the suspension system. Shocks, on the other hand, are more of a “bolt-on” solution for bounce control. As such, struts are generally more expensive than shocks and they can be used for more than just controlling spring motion – they can also be used as pivot points in the suspension and can take the place of other suspension components.

Springs

Springs are important components and work with both shocks and struts to control spring motion. You’ll find that buying a set of aftermarket springs gives you a set of four – two shorter springs for the rear and two longer ones for the front. There’s a very good reason for this. The front of the vehicle requires considerably stronger support and bounce control due to the weight of the engine and the effect of spring motion on steering. The rear of the vehicle, on the other hand, is very light (in comparison, of course), and does not require as much control or the same level of stability.

You’ll also find aftermarket coil over springs. These differ from OEM replacement springs in that they are designed to work in tandem with aftermarket shocks and struts to lower your vehicle. Coil over springs can provide substantial control, but you’ll sacrifice comfort when lowering your vehicle. Essentially, it reduces not only the height of the vehicle to the road, but the amount of travel in the strut/shock assemblies. The result is a “hard” suspension.

Considerations When Replacing Shocks, Struts and Springs

There will come a time when you need to replace your suspension components. Shocks and struts are both prone to wear damage. Eventually, the fluid seals that keep the hydraulic fluid within the chamber will wear out. This can lead to either a slow leak or immediate failure. Strut/shock failure should be immediately noticeable and usually presents as a “knocking” sound/feel when traveling over bumps and rough road surfaces.

When replacing your suspension components, it’s important to purchase items that are made for your specific vehicle. You’ll find a range of “universal” fit components out there, but these are really subpar solutions to your needs. Vehicle-specific components are designed with your vehicle in mind, which means they’re engineered to provide the best performance possible, while supporting your vehicle’s weight, providing steering control and offering a more comfortable ride.

Don Elfrink is the Owner and Operator of AutoMatStore.com where he specializes in selling custom floor mats. Prior to owning AutoMatStore, Elfrink worked in the automotive industry for over 30 years.

Fixer Upper: 5 Must-Knows for Fixing Your Car on Your Own

Fixing your car on your own can come with its rewards. You will save money by fixing your own car, and you will more than likely get the job done in a fraction of the time it would take a mechanic to do it. Before you pop the hood, make sure you adhere to each of these five must-knows for fixing your own car. They could save you time, money, and your safety.

Go with Quality Parts

Don’t try to cut corners financially by simply going with the least expensive part available for the repair. Sure, you’ll save money in the moment, but who’s to say that part won’t bite the dust a month down the line? At that point, you will be out whatever you paid for the part, and your car will also be broken down again. Pay a little extra and go with either the genuine manufacturer part or an equivalent.

Don’t Smoke While Repairing Your Vehicle

It might look cool in the movies when the main character works on their car with a cigarette hanging out of their mouth, but in reality, this is extremely dangerous. Always extinguish your cigarette before going anywhere near your vehicle to perform repair work.

Keep Extra Screws and Bolts on Hand

When it comes to repairing a car, you can truly never have too many lag bolts or lag screws on hand for emergency cases. Instead of buying expensive hardware from home depot stores, buy the screws and bolts from specialty companies such as WholesaleBolts.com. It never hurts to keep this type of hardware on hand and in bulk, so be sure that you’re stocked up at all times.

Never Crawl Under a Poorly Elevated Vehicle

Simply enough, if your car is only being supported by one jack, do not attempt to crawl underneath it to repair parts under the body. Instead, make sure you use a jack paired with support stands to strengthen the hold.

Take Caution with Electrical Work

Lastly, be extra cautious when performing electrical work. Before starting, disconnect one of the cables from the battery terminal. This will prevent an electric current from shorting out an electrical component in your car, or worse, starting a fire.

Overall, work smart when you’re repairing your vehicle. If you aren’t familiar with a repair and don’t have the slightest clue as to what you’re doing, stop and let a certified mechanic take a look at it.

How to Flush Your Radiator on Your Own and Save Money

Your radiator is an essential part of your vehicle – it keeps the engine from overheating and also protects against freezing temperatures. However, just like every other vehicle system, your radiator needs to be properly maintained. While you won’t have to drain and fill your antifreeze with the same regularity you’ll need to change your engine oil, it does need to be flushed and filled periodically. There’s good news too; you can do this on your own very easily, and save both time and money.

When to Flush

As mentioned, flushing your radiator isn’t something you’ll need to do frequently, but it should be done on a regular basis. Most cars should have their radiator flushed and filled every five years or so. Older models should have more frequent flushes, particularly if there are signs of cooling system deterioration.

Watch What You’re Doing

Flushing and filling your radiator is good not only for keeping your cooling system in good shape, but for making sure it’s healthy as well. While the coolant drains out, keep an eye on it for signs of damage (white flakes, gunk and debris in large amounts can all be signs of impending doom).

What to Do

If you’re prepared to flush and fill your radiator, there are only a few simple steps you need to take. First, make sure you have the essentials:

  • Replacement coolant
  • A catch pan for the old coolant
  • A source of clean water
  • A funnel
  • Rubber gloves

Step 1:

Wait until the engine has cooled enough that the antifreeze will not burn you and the system is no longer pressurized. Open the radiator cap. Place the catch pan under the car.

Step 2:

Locate the drain cock under your radiator. Turning this opens the valve at the bottom of the radiator and allows the old coolant to drain out. Do not attempt this until the engine has cooled down. Make sure the catch pan is directly below the drain.

Step 3:

Open the drain cock and allow the coolant to drain out. Allow the car to sit for several minutes (it can take some time for the coolant to drain out).

Step 4:

Close the drain cock and fill the radiator with clean tap water. Fill the radiator until the water comes to the top of the opening in the radiator’s fill neck.

Step 5:

Crank your car (with the radiator cap off). Allow the car to run and warm up. Once the cooling fan cycles on, you know the thermostat has opened and water has flushed through the system. Turn the car off.

Step 6:

Drain the water from the radiator by opening the drain cock and draining the water/antifreeze mix into the catch pan.

Step 7:

This step can be omitted unless you purchased a chemical flush kit. Note that flush kits are really only recommended for high mileage engines with serious scaling in the radiator. If you have a kit, add the fluid and water now and repeat the above steps, following the directions on the can. Drain the mixture when done.

Step 8:

With the drain open (and the car off), add water to the radiator. It should flow through the system and out the drain, carrying with it any remaining antifreeze and debris. When the water turns clear, stop filling it and allow it all to drain out.

Step 9:

Close the drain and refill the radiator with clean antifreeze. When the radiator is full, start the car and allow the cooling fan to cycle on (signifying that the thermostat has opened and the system is cycling). Top off the coolant in the radiator and reservoir with your fresh antifreeze until it reaches the full mark. Check it with a hygrometer to make sure you have enough protection from freezing.

Don Elfrink is the owner and operator of AutoMatStore, an auto flooring company based out Columbia, Missouri. Before AutoMatStore, Elfrink was the operator of an automotive production site. AutoMatStore floor mats consist of customized logo, carpet, molded and all weather mats.